


All accessibility settings in Monster Hunter Wilds
Thanks to the Monster Hunter series' massive explosion in popularity, Monster Hunter Wilds is doing everything it can to be as accessible and enjoyable to as many players as possible. And thanks to its admirable amount of accessibility settings, Wilds is sure to expand the franchise's audience even further. Monster Hunter Wilds accessibility settings Screenshot by Destructoid You'll want to be on the main menu to change some of the accessibility settings in Monster Hunter Wilds, as certain updates need to be made on a larger scale. Other settings are listed in the accessibility sub-menu but cannot be changed there. For instance, the setting to add a background to subtitles is actually in the Game sub-menu. We'll note where you can find the toggle for each setting below. Colorblindness and Arachnophobia settings The first two accessibility settings offer solutions to more specific differences players experience. First, there are three different color schemes for those who experience various types of color blindness. Specifically: Protanope for players who have trouble seeing red light. Deuteranope for players who have trouble seeing green light. Tritanope for players who have trouble seeing blue light. Additionally, if you or someone you know suffers from arachnophobia, you can turn on the arachnophobia assistance setting. This alters the in-game models of specific monsters and endemic life to less spidery shapes. While arachnophobia assistance does go a long way with adjusting the smaller monsters, large monsters like the Lala Barina still have well-defined spider legs. The change is primarily to their main body, altering things like additional fur and removing easy visibility of the beast's stinger and fangs. Visual Accessibility Screenshot by Destructoid You can change the visual accessibility settings in the Game sub-menu. There are eight different categories, each with at least two setting types. The outlier is the HUD setting group, which allows you to alter the size and visibility of 19 different HUD elements. We'll start there. HUD accessibility Screenshot by Destructoid Each HUD element can come in four sizes: small, default, large, and hidden. The settings are: Health Gauge Stamina Gauge Melee Weapon Sharpness Gauge Weapon Information (for weapons with additional gauges) Party info (including your cat and other NPC/player hunters) Scoutfly Notifications (nearby items, monster parts, etc.) Minimap Environment Clock Target Monster Icon Button Guide (showing what each input will do) Objectives Chat Notifications Slinger Display Item Bar Ammo/Coatings Bar Custom Radial Menu (on controller) Keyboard Shortcuts Name Display: Interactives Name Display: Characters and Palicoes You can change the remaining visual accessibility settings on page two of the Game Settings sub-menu. The various gauge displays come in two formats: fixed, where you can see the gauge at all times, and dynamic, where they're minimized until it's deemed necessary to show them in full. The "necessary" situation is usually when the value a gauge measures changes. For instance, if you use Dynamic for your Stamina bar's visibility, it won't be visible until you start doing Stamina-consuming actions. Additional Visual Settings Health Gauge Display Stamina Gauge Display Sharpness Gauge Display Companion Health Gauge Display Menu Text Size: Choose between small, default, and large Subtitle Text Size: Choose between small, default, and large Subtitle Background: choose to display a semi-opaque background behind subtitles or not. Auditory Accessibility Screenshot by Destructoid Monster Hunter Wilds offers a few options for those with difficulty hearing. You'll find them in the Audio Settings. They are: Closed Captions Cutscene Subtitles Speaker Names (shown within cutscenes) Speaker Names (shown outside of cutscenes) Motion Sickness Reduction Screenshot by Destructoid My personal favorite of the accessibility settings in Monster Hunter Wilds is the ability to adjust how the game displays camera shake, sway, centering, and other movements. Wilds gameplay is very fluid and requires lots of manual camera adjustment to play at a higher level. If you're someone like me who's vulnerable to motion sickness, the ability to fine-tune the game's camera work is a godsend. You'll find most of these options in the Camera sub-menu. They are: Camera Distance: Zoom (the distance between the camera and the player Hunter) Camera Shake (the severity of camera movement during certain in-game events like large ground impacts) Ambient Camera Sway (how much the camera moves on its own) Lateral Camera Correction: Normal (how much the camera leads ahead of your character when moving side-to-side while on foot) Lateral Camer Correction: Mounted (as Normal, but while riding a Seikret) Auto-centering: Normal (whether or when the camer
Thanks to the Monster Hunter series' massive explosion in popularity, Monster Hunter Wilds is doing everything it can to be as accessible and enjoyable to as many players as possible. And thanks to its admirable amount of accessibility settings, Wilds is sure to expand the franchise's audience even further.
Monster Hunter Wilds accessibility settings
You'll want to be on the main menu to change some of the accessibility settings in Monster Hunter Wilds, as certain updates need to be made on a larger scale. Other settings are listed in the accessibility sub-menu but cannot be changed there. For instance, the setting to add a background to subtitles is actually in the Game sub-menu. We'll note where you can find the toggle for each setting below.
Colorblindness and Arachnophobia settings
The first two accessibility settings offer solutions to more specific differences players experience. First, there are three different color schemes for those who experience various types of color blindness. Specifically:
- Protanope for players who have trouble seeing red light.
- Deuteranope for players who have trouble seeing green light.
- Tritanope for players who have trouble seeing blue light.
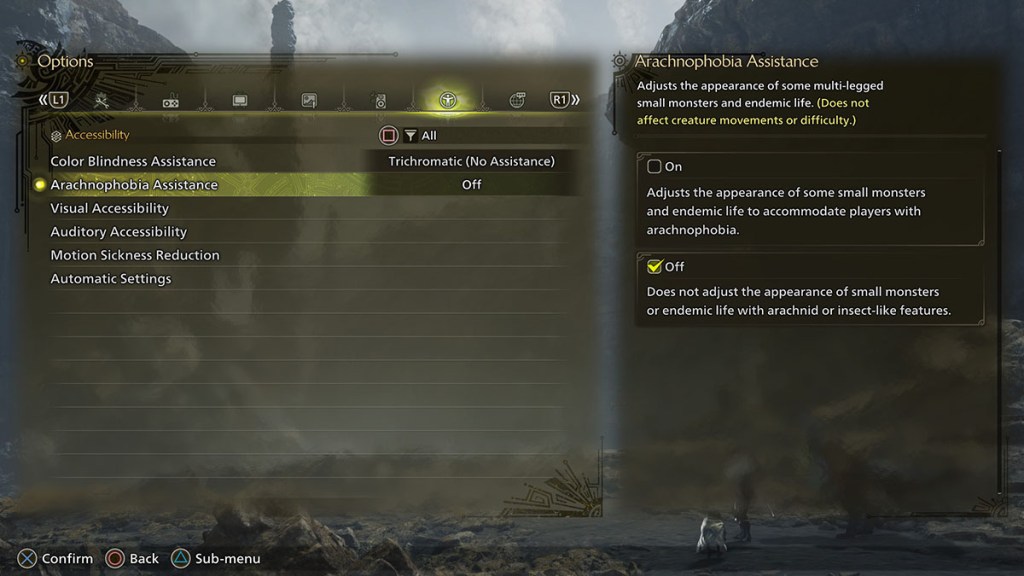
Additionally, if you or someone you know suffers from arachnophobia, you can turn on the arachnophobia assistance setting. This alters the in-game models of specific monsters and endemic life to less spidery shapes.
While arachnophobia assistance does go a long way with adjusting the smaller monsters, large monsters like the Lala Barina still have well-defined spider legs. The change is primarily to their main body, altering things like additional fur and removing easy visibility of the beast's stinger and fangs.
Visual Accessibility
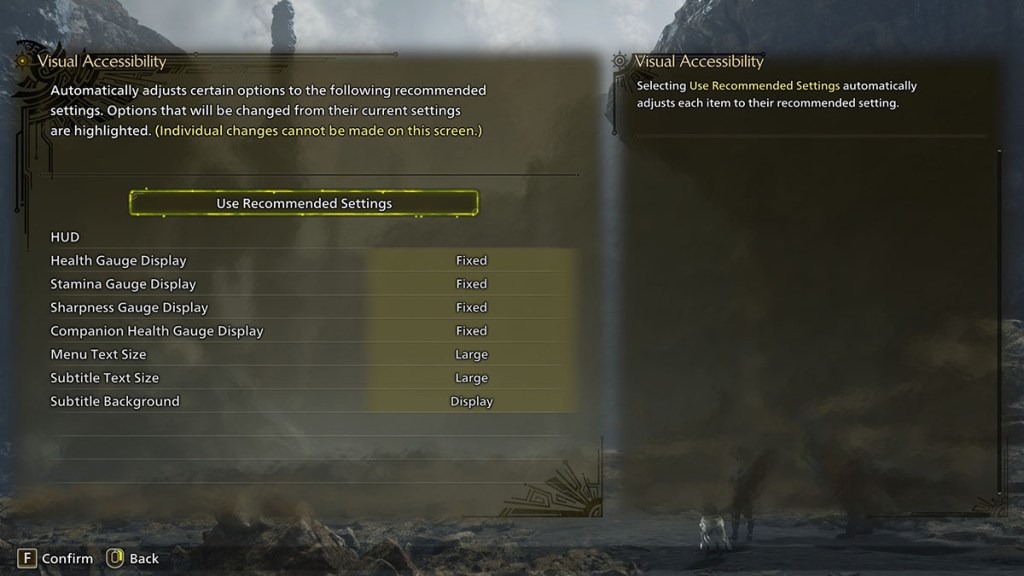
You can change the visual accessibility settings in the Game sub-menu. There are eight different categories, each with at least two setting types. The outlier is the HUD setting group, which allows you to alter the size and visibility of 19 different HUD elements. We'll start there.
HUD accessibility
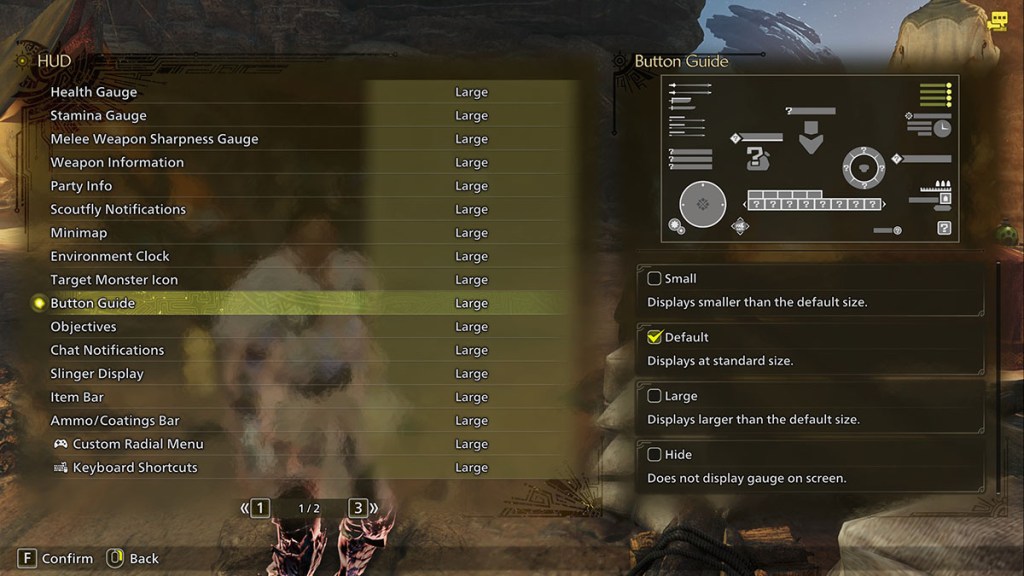
Each HUD element can come in four sizes: small, default, large, and hidden. The settings are:
- Health Gauge
- Stamina Gauge
- Melee Weapon Sharpness Gauge
- Weapon Information (for weapons with additional gauges)
- Party info (including your cat and other NPC/player hunters)
- Scoutfly Notifications (nearby items, monster parts, etc.)
- Minimap
- Environment Clock
- Target Monster Icon
- Button Guide (showing what each input will do)
- Objectives
- Chat Notifications
- Slinger Display
- Item Bar
- Ammo/Coatings Bar
- Custom Radial Menu (on controller)
- Keyboard Shortcuts
- Name Display: Interactives
- Name Display: Characters and Palicoes
You can change the remaining visual accessibility settings on page two of the Game Settings sub-menu. The various gauge displays come in two formats: fixed, where you can see the gauge at all times, and dynamic, where they're minimized until it's deemed necessary to show them in full. The "necessary" situation is usually when the value a gauge measures changes. For instance, if you use Dynamic for your Stamina bar's visibility, it won't be visible until you start doing Stamina-consuming actions.
Additional Visual Settings
- Health Gauge Display
- Stamina Gauge Display
- Sharpness Gauge Display
- Companion Health Gauge Display
- Menu Text Size: Choose between small, default, and large
- Subtitle Text Size: Choose between small, default, and large
- Subtitle Background: choose to display a semi-opaque background behind subtitles or not.
Auditory Accessibility
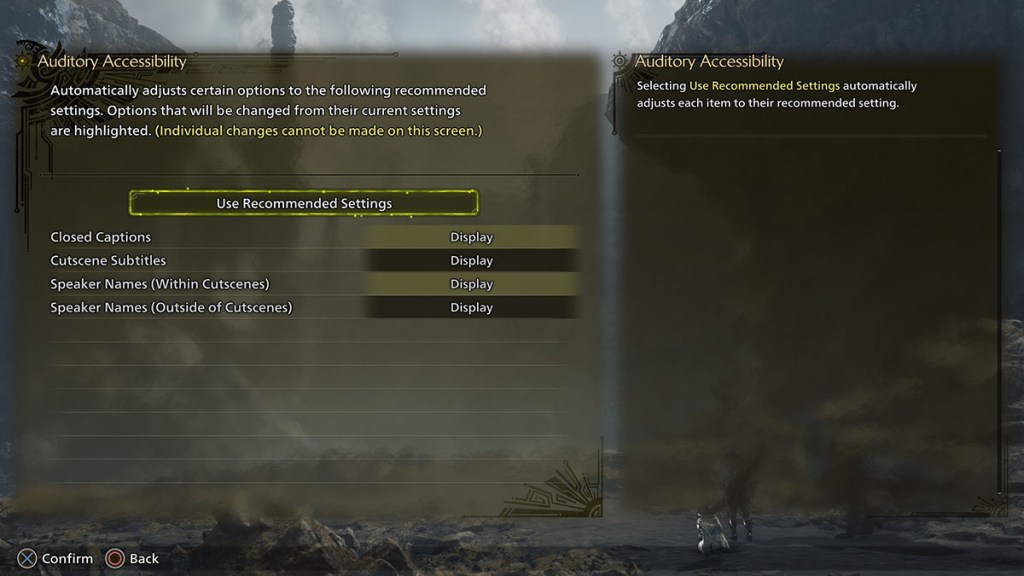
Monster Hunter Wilds offers a few options for those with difficulty hearing. You'll find them in the Audio Settings. They are:
- Closed Captions
- Cutscene Subtitles
- Speaker Names (shown within cutscenes)
- Speaker Names (shown outside of cutscenes)
Motion Sickness Reduction
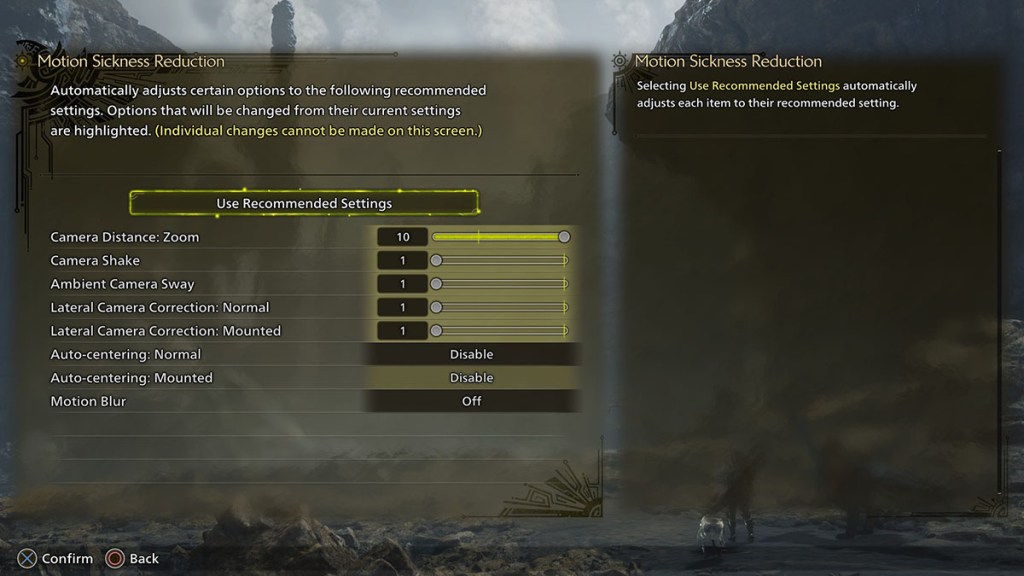
My personal favorite of the accessibility settings in Monster Hunter Wilds is the ability to adjust how the game displays camera shake, sway, centering, and other movements. Wilds gameplay is very fluid and requires lots of manual camera adjustment to play at a higher level. If you're someone like me who's vulnerable to motion sickness, the ability to fine-tune the game's camera work is a godsend.
You'll find most of these options in the Camera sub-menu. They are:
- Camera Distance: Zoom (the distance between the camera and the player Hunter)
- Camera Shake (the severity of camera movement during certain in-game events like large ground impacts)
- Ambient Camera Sway (how much the camera moves on its own)
- Lateral Camera Correction: Normal (how much the camera leads ahead of your character when moving side-to-side while on foot)
- Lateral Camer Correction: Mounted (as Normal, but while riding a Seikret)
- Auto-centering: Normal (whether or when the camera is always facing the way the player Hunter is facing)
- Auto-centering: Mounted (as Normal, but while riding a Seikret)
- Motion Blur (whether a blur effect is applied to movement. Found in the Graphics sub-menu, page three)
Automatic Settings
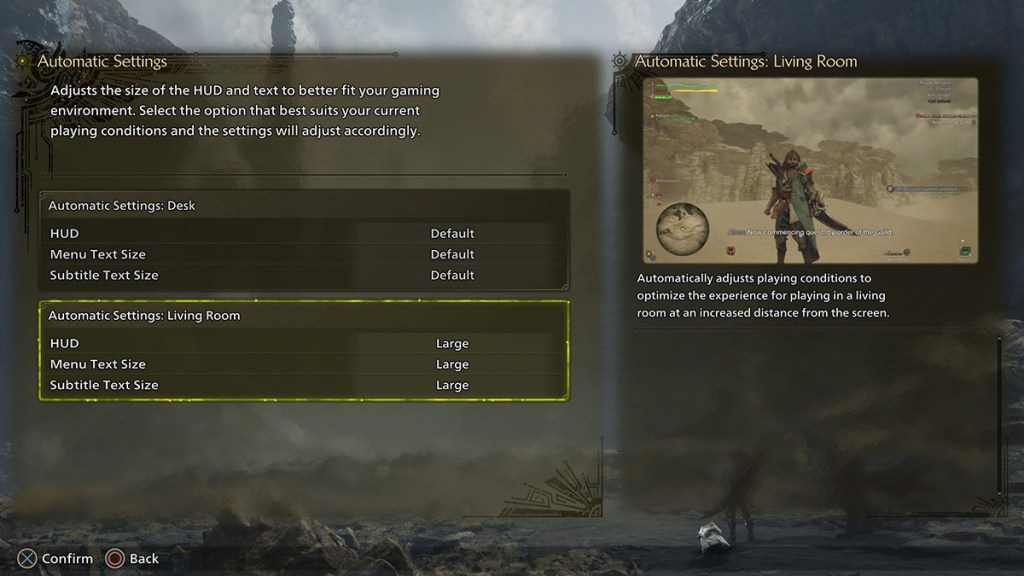
This last pair of settings are simple and blanket adjustments to the HUD scaling based on how you play the game. Specifically, these settings alter the HUD sizeand the Menu and Subtitle text size. The two settings are:
- Automatic Size: Desk (all sizes are default)
- Automatic Size: Living Room (all sizes are large)
Those are all the accessibility settings available in Monster Hunter Wilds. It's not the most exhaustive list, but it does go a way toward accommodating a wider player base. Hopefully, they'll help you or someone you know who's always wanted to play the series but hasn't been able to for one reason or another.
The post All accessibility settings in Monster Hunter Wilds appeared first on Destructoid.

