


Want To Get Creative With Your White Balance? This Tip Can Help You Find The Best Look
So, here’s the scenario: you’re not looking for an accurate white balance – instead, you want to try something creative, but you’re not sure which white balance setting you might like best. This is where Virtual Copies (and another great Lightroom feature we’ll talk about in just a sec) come in really handy. First, if you’re not familiar with Virtual Copies, here’s a quick glimpse at what they are, and we’ll use Photoshop as an example. If you were to open a 50-megapixel image in Photoshop and you want to compare that image with another copy of it, you would have to duplicate that image. That means you now have another 50-megabyte photo on your computer. You’ve literally doubled your file size just to see a second version of your image. In Lightroom, when you create a Virtual copy, it doesn’t duplicate the file. It essentially duplicates just the thumbnail, so it barely takes up any space at all. SoK you can make as many copies as you like, so you can compare them without really taking up any extra space. It’s why they’re called “virtual copies” — it doesn’t make a real copy. This will make more sense in just a moment. Follow along below: STEP ONE: Here’s our original image with our ‘As Shot’ white balance. To make a virtual copy, you simply right-click on the image (if you’re on a Mac and don’t have a 2nd mouse button, just Ctrl-click on it) and a menu appears (seen above). Choose ‘Create Virtual Copy’ as shown here. When you do this, if you look at your thumbnails in the Library Grid view (or down in the Filmstrip) you’ll see it created a thumbnail just to the right of the original and it looks exactly like another copy of your image file, but remember — it’s not — it’s just a virtual copy. It’s perfect for experimenting with things like White Balance. STEP TWO: Since this is a virtual copy, let’s experiment and choose a different white balance by dragging the Temperature and Tint sliders. Since we’re doing this on a Virtual Copy, it doesn’t affect our original at all. We’re just experimenting — our original remains untouched. STEP THREE: Let’s do it again. Let’s make another Virtual copy and try a different white balance. If you want an even faster way, there’s a keyboard shortcut. It’s Command-‘ on Mac or Ctrl-‘ on a Windows PC). Once your new virtual copy appears, in the Develop Module, drag the White Balance Temperature and Tint sliders around to come up with another white balance look for your image. STEP FOUR: You can repeat this process of making virtual copies and tweaking the white balance as many times as you like. Since these are all virtual, it doesn’t add any drive space or overhead to Lightroom. This is an unlimited experimentation time. STEP FIVE: Once you’ve got a bunch of ’em — all with different White Balances, here’s the fun part: Select them all, then press the letter ‘n’ on your keyboard to enter Lightroom’s Survey Mode, which arranges all your selected images on screen so you can see all the different looks, and find the one (or more) you like best. STEP SIX: Once you know which one you like, you can leave Survey mode by pressing ‘n’ again, and it returns you to the Grid View. Now, if you like, you can mark your favorite image as a 5-star, or give it a color label, a pick flag — something to mark it as your white balance choice. Now you can delete the other Virtual Copies if you want. Note: You can see which ones are virtual copies by looking in the bottom left corner of the thumbnail. If you see a turned-up page corner (I circled it above in red), it’s a virtual copy. Just click on any one you want to delete, then press the Delete key (Backspace on PC) to remove its thumbnail, and now it’s like it never happened. But what about that Virtual Copy — it’s not real, right? What if you want to print that one you liked or export it outside of Lightroom? How do you make it into a real file? Well, here’s the good news — you don’t have to do anything. Lightroom treats it like it’s a real file, and when you want to export it from Lightroom using the Export feature (maybe you want to upload it to your portfolio or Instagram or Facebook), it automatically calls on the original file to create a real image for you, so it looks and acts like the real thing all the way through saving or printing. This is just another reason I love virtual copies (and survey mode, too!). Have a great weekend, everybody!

So, here’s the scenario: you’re not looking for an accurate white balance – instead, you want to try something creative, but you’re not sure which white balance setting you might like best. This is where Virtual Copies (and another great Lightroom feature we’ll talk about in just a sec) come in really handy.
First, if you’re not familiar with Virtual Copies, here’s a quick glimpse at what they are, and we’ll use Photoshop as an example. If you were to open a 50-megapixel image in Photoshop and you want to compare that image with another copy of it, you would have to duplicate that image. That means you now have another 50-megabyte photo on your computer. You’ve literally doubled your file size just to see a second version of your image. In Lightroom, when you create a Virtual copy, it doesn’t duplicate the file. It essentially duplicates just the thumbnail, so it barely takes up any space at all. SoK you can make as many copies as you like, so you can compare them without really taking up any extra space. It’s why they’re called “virtual copies” — it doesn’t make a real copy. This will make more sense in just a moment. Follow along below:
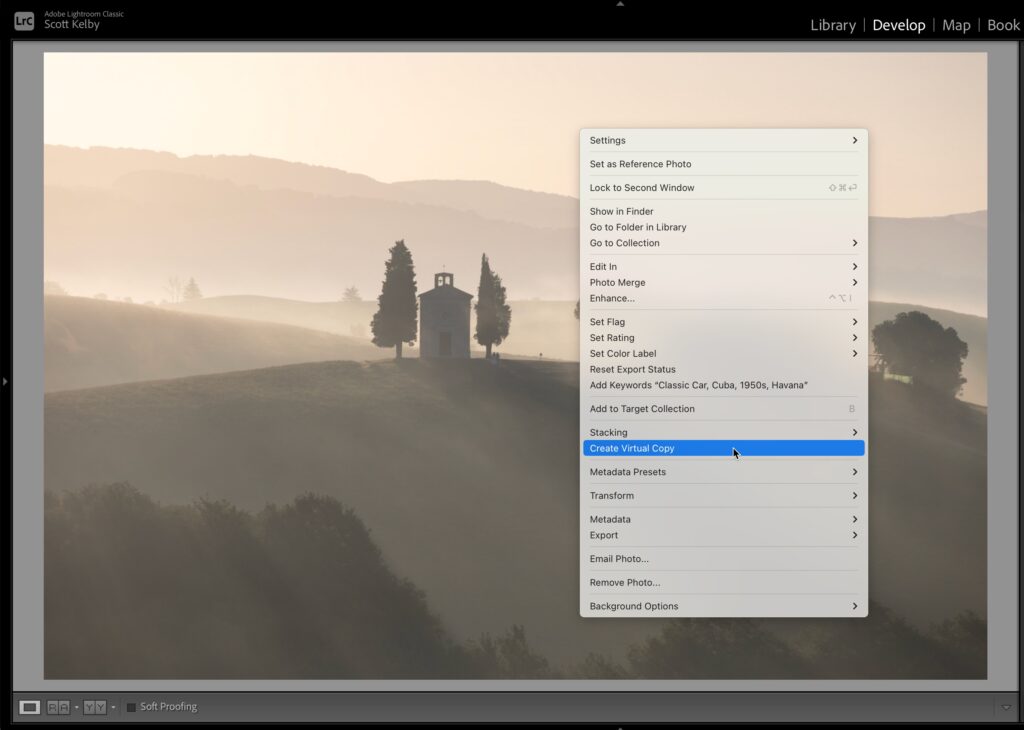
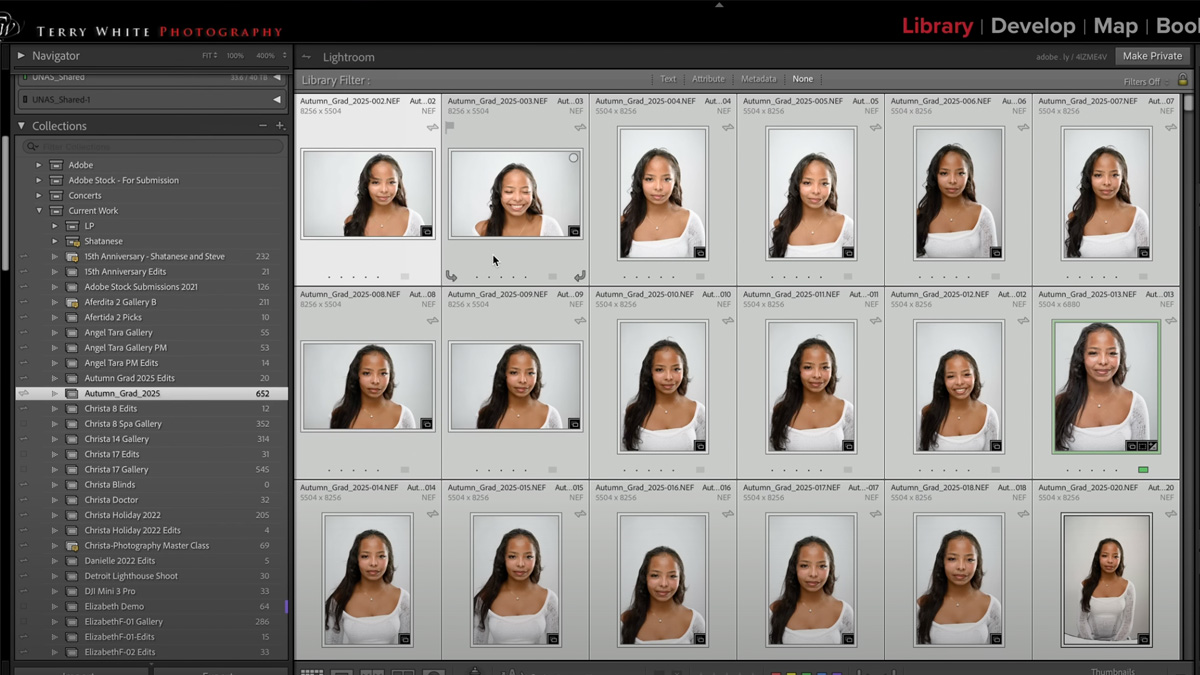
STEP ONE: Here’s our original image with our ‘As Shot’ white balance. To make a virtual copy, you simply right-click on the image (if you’re on a Mac and don’t have a 2nd mouse button, just Ctrl-click on it) and a menu appears (seen above). Choose ‘Create Virtual Copy’ as shown here.
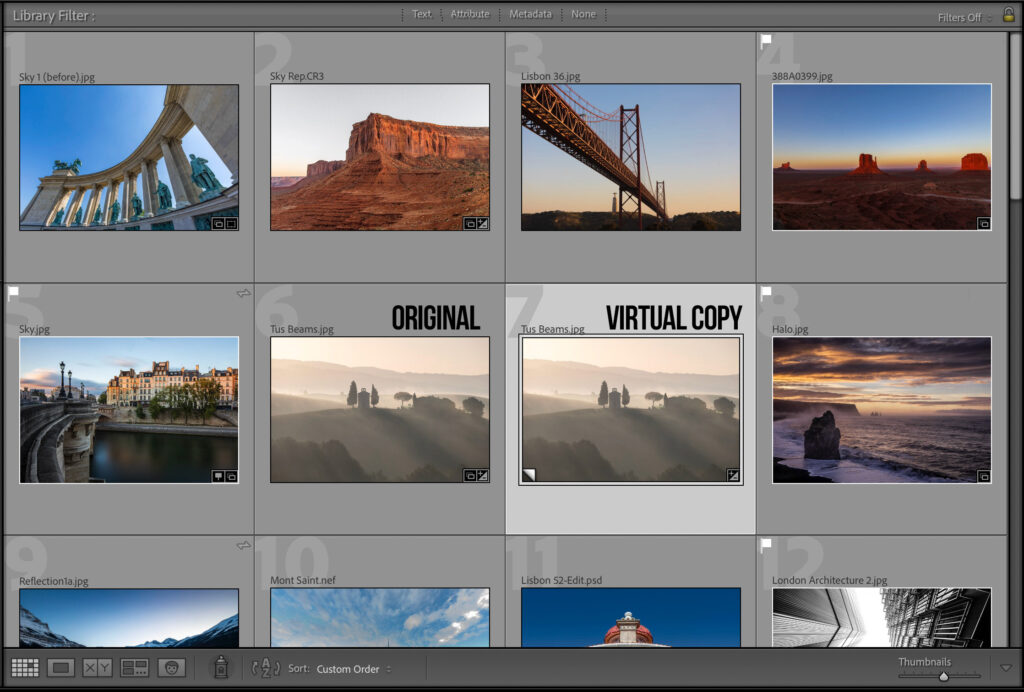
When you do this, if you look at your thumbnails in the Library Grid view (or down in the Filmstrip) you’ll see it created a thumbnail just to the right of the original and it looks exactly like another copy of your image file, but remember — it’s not — it’s just a virtual copy. It’s perfect for experimenting with things like White Balance.
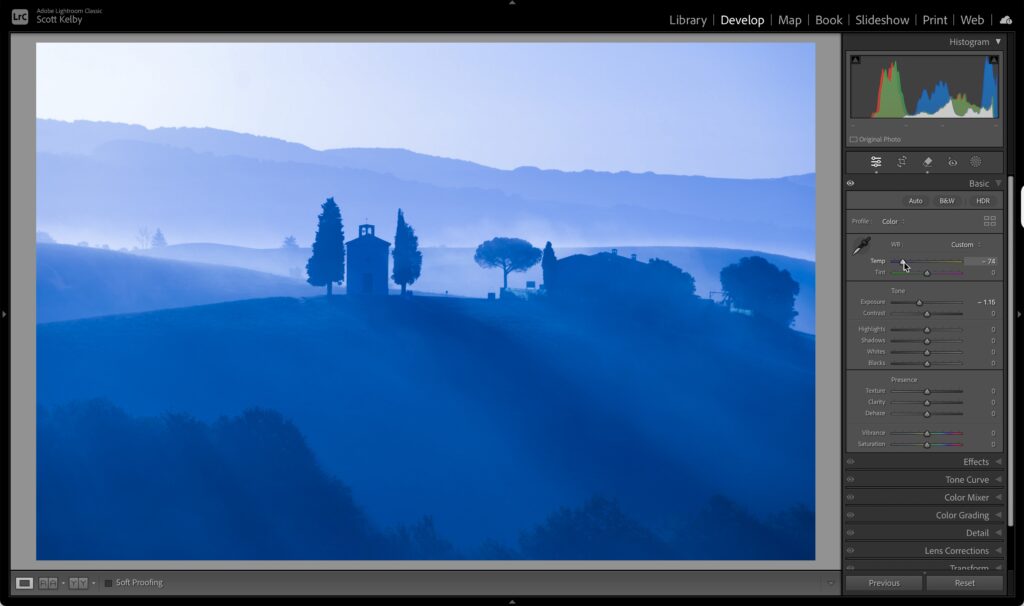
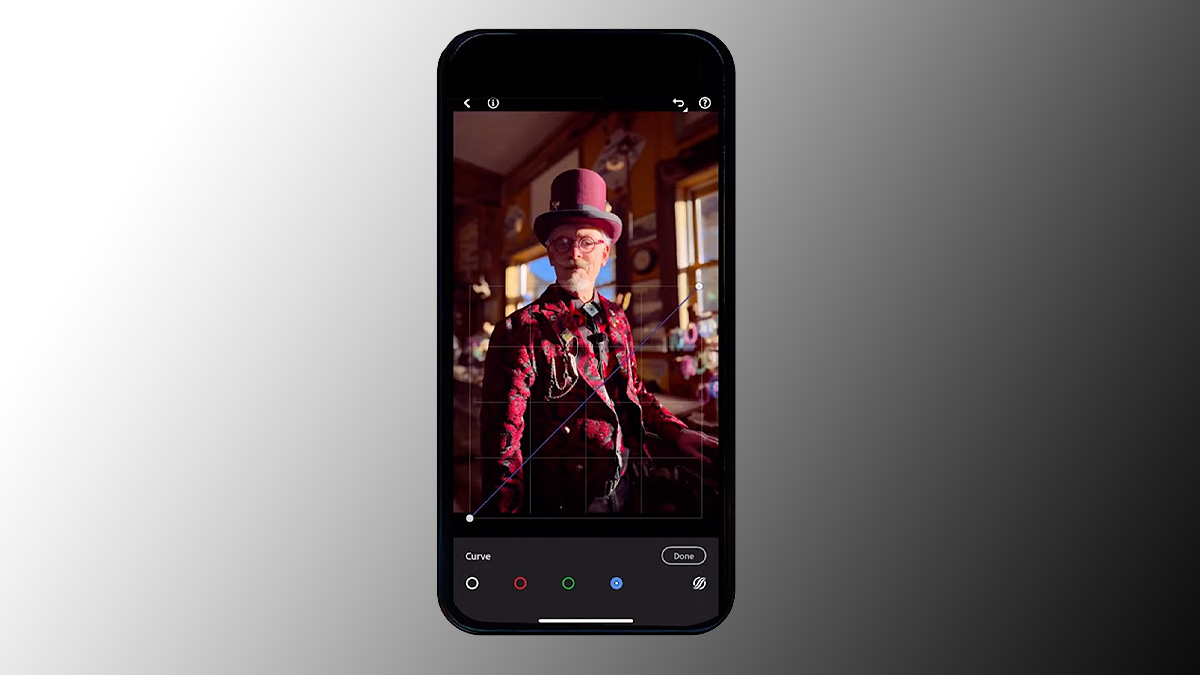
STEP TWO: Since this is a virtual copy, let’s experiment and choose a different white balance by dragging the Temperature and Tint sliders. Since we’re doing this on a Virtual Copy, it doesn’t affect our original at all. We’re just experimenting — our original remains untouched.

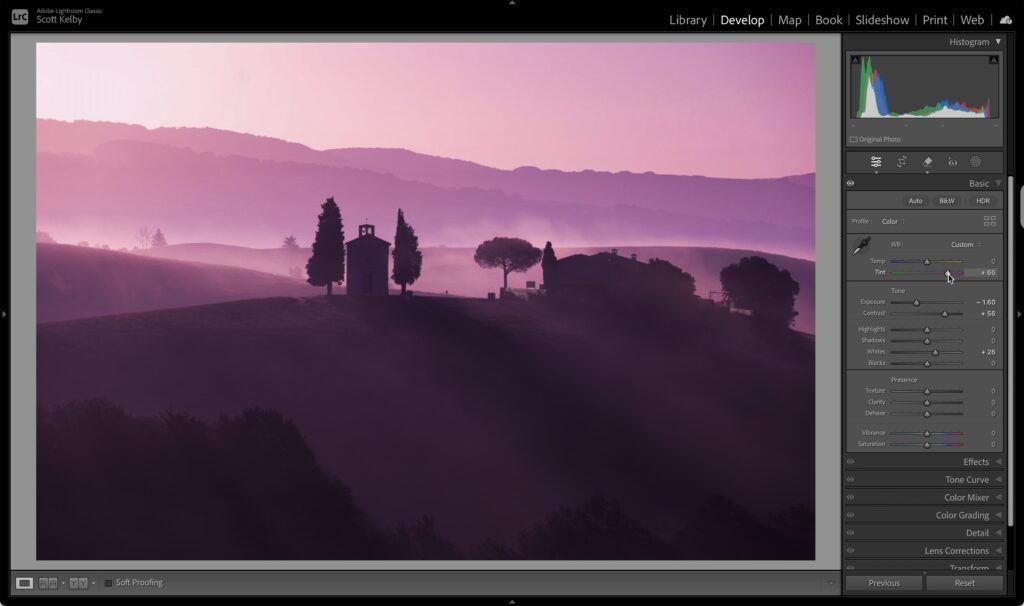
STEP THREE: Let’s do it again. Let’s make another Virtual copy and try a different white balance. If you want an even faster way, there’s a keyboard shortcut. It’s Command-‘ on Mac or Ctrl-‘ on a Windows PC). Once your new virtual copy appears, in the Develop Module, drag the White Balance Temperature and Tint sliders around to come up with another white balance look for your image.
STEP FOUR: You can repeat this process of making virtual copies and tweaking the white balance as many times as you like. Since these are all virtual, it doesn’t add any drive space or overhead to Lightroom. This is an unlimited experimentation time.
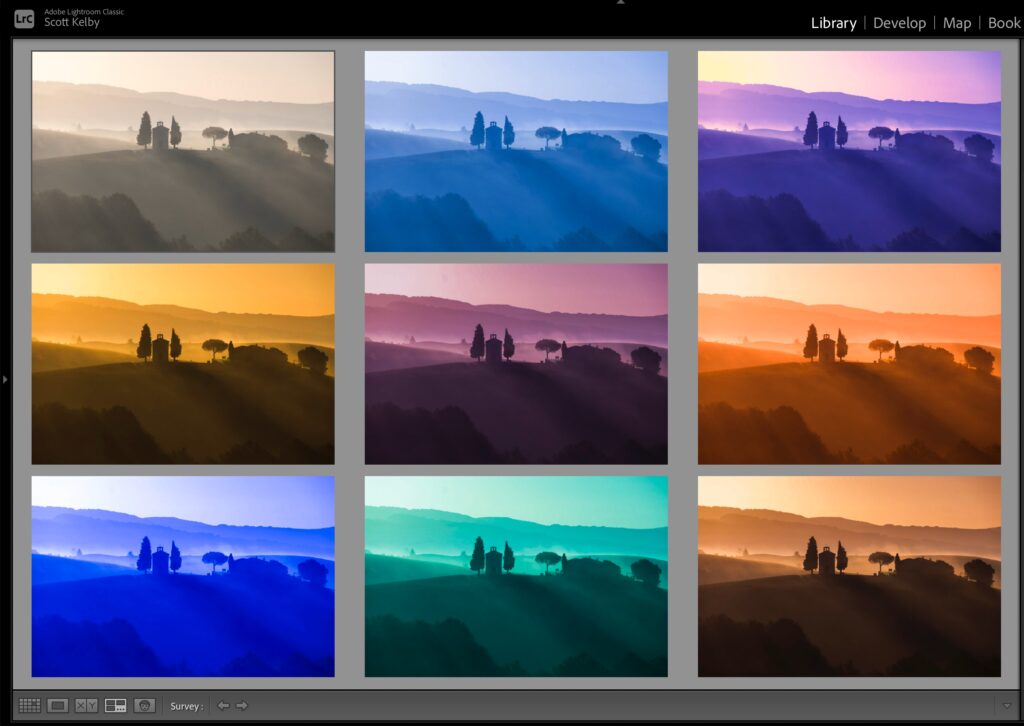
STEP FIVE: Once you’ve got a bunch of ’em — all with different White Balances, here’s the fun part: Select them all, then press the letter ‘n’ on your keyboard to enter Lightroom’s Survey Mode, which arranges all your selected images on screen so you can see all the different looks, and find the one (or more) you like best.
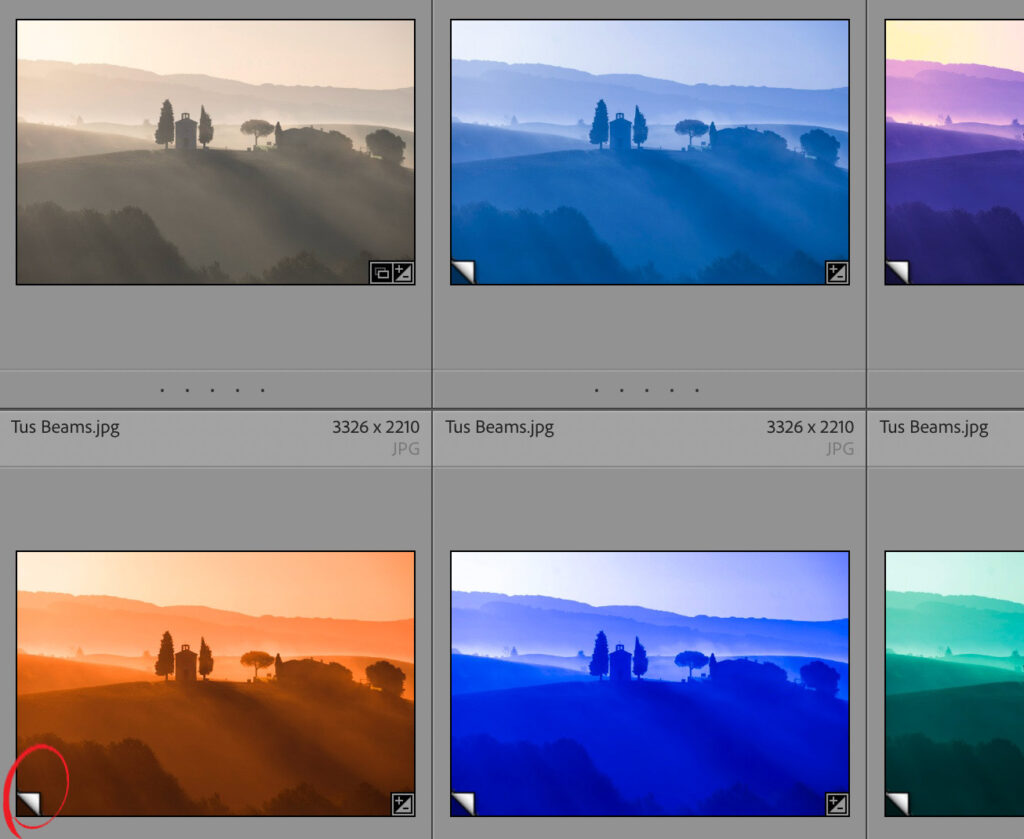
STEP SIX: Once you know which one you like, you can leave Survey mode by pressing ‘n’ again, and it returns you to the Grid View. Now, if you like, you can mark your favorite image as a 5-star, or give it a color label, a pick flag — something to mark it as your white balance choice. Now you can delete the other Virtual Copies if you want. Note: You can see which ones are virtual copies by looking in the bottom left corner of the thumbnail. If you see a turned-up page corner (I circled it above in red), it’s a virtual copy. Just click on any one you want to delete, then press the Delete key (Backspace on PC) to remove its thumbnail, and now it’s like it never happened.
But what about that Virtual Copy — it’s not real, right?
What if you want to print that one you liked or export it outside of Lightroom? How do you make it into a real file? Well, here’s the good news — you don’t have to do anything. Lightroom treats it like it’s a real file, and when you want to export it from Lightroom using the Export feature (maybe you want to upload it to your portfolio or Instagram or Facebook), it automatically calls on the original file to create a real image for you, so it looks and acts like the real thing all the way through saving or printing. This is just another reason I love virtual copies (and survey mode, too!).
Have a great weekend, everybody!  Read More