


![Ultimate Anime Rangers X Units Tier List [RELEASE]](https://www.destructoid.com/wp-content/uploads/2025/04/anime-rangers-x-tier-list.webp?quality=75)


February Update Lightroom Classic, Lightroom, and Camera Raw
Adobe has released an update for Lightroom Classic (14.2), Lightroom desktop (8.2), Lightroom for mobile (10.2), and Camera Raw (17.2). This update includes support for new cameras and new lenses as well as bug fixes and performance improvements. We did also get some new features, which we’ll explore below. Adaptive Profiles Originally released as a public beta in Camera Raw, a more refined version of Adaptive Profiles have now expanded to all of the Lightroom family of apps. For a very detailed explanation of Adaptive Profiles and how they work I highly recommend this article from the Camera Raw team. You can find two new profiles, Adaptive Color and Adaptive B&W under the Profile drop-down menu or in the Profile Browser. All profiles are a starting point for your editing in which they affect color and tone, but don’t move any of the sliders. The difference with the Adaptive Profiles is that they are powered by machine learning and image dependent. Meaning that when you select an Adaptive Profile the AI powered model analyzes the photo (only raw photos at this time) and adjusts color and tone based on that analysis (be sure to read the article I linked previously for the nitty gritty details) to give you a different starting place than any of the pre-existing profiles. Here’s a comparison of this photo with Adobe Color profile as the Before (left) and Adpative Color as the After (right): I think the results of the Adaptive Profile is a much more vibrant, yet natural starting point for editing this photo, and notice that all of the adjusments are still zeroed out. However, the Adaptive Profiles also come with an Amount slider, which when decreased dials down the effect of the profile and when increased amplifyies the effect. These profiles will take some testing to find which photos you feel they work best on, and note that they are not (currently) designed to work in conjunction with the Auto button (it will warn you against this). Originally designed to help with HDR image editing I find they work well on standard dynamic range (SDR) photos that do have a wide range of tones (like the one above). So, give them a try and see what you think. Backup Catalog Management (LrC) We talk a lot about the importance of taking advantage of the automated backing up your LrC catalog here at Lightroom Killer Tips, but until now the managment of the removal of old backup catalog files has had to happen completely outside of LrC (in your file browser). With this update, you’ll find a new tab on the Catalog Settings dialog dedicated to catalog backup. This new Backups tab is also now home to the control for scheduling the backup frequency (previously found on the General tab). My favorite aspect of this new tab is that Adobe finally included the means for choosing the folder where your backup catalog is saved! It will still appear on the dialog that comes up when it prompts you to run the backup, but it makes so much more sense to be able to control that from here before you are prompted to actually run the backup. Thank you, Adobe for doing this! The other new feature may be a revelation to some folks, which is that it now shows you where your backup copies are stored, how big each file is, and gives you the tools to show the folder containing them in your file browser (click the Show button), delete them from the hard drive (click the Delete button), or remove them from this list without deleting from the hard drive (click the Remove button). Prior to this update, I would just periodically (when I remembered) use my file browser to navigate to the folder containing the backup copies and delete all but the most recent 3 or 4 backup copies. I may still do this out of habit, but now you can more easily see how these are filling up your drive and take control right from within LrC. Hold down the CMD key on Mac / Ctrl key on Windows to select multiple catalog files at once. Happy Spring cleaning! Focus Point Selection while Tethered Another new LrC-only feature is the ability to click anywhere in the Live view window (while tethered with a supported camera) to change the focus point. This hasn’t been officially tested on all the cameras that are supported for tethering in general, so your mileage may vary depending on your camera, but I’m sure in time it will expand to support more models. Additionally, LrC gained some performance enhancments while editing that should improve the experience when using the brush tool in masking, moving white balance sliders, and changing the angle when rotating in the Crop tool. Secondary Window in Lightroom Desktop Similar to the Secondary Window in LrC, we now have the abilty to open Secondary Window in Lr as well. This primarily useful for people with two displays, but it can also be used with a single display if you want to have a larger photo grid displayed along with the main window. If you only have a single display (as I do currently), then you need to go to the View menu to control th
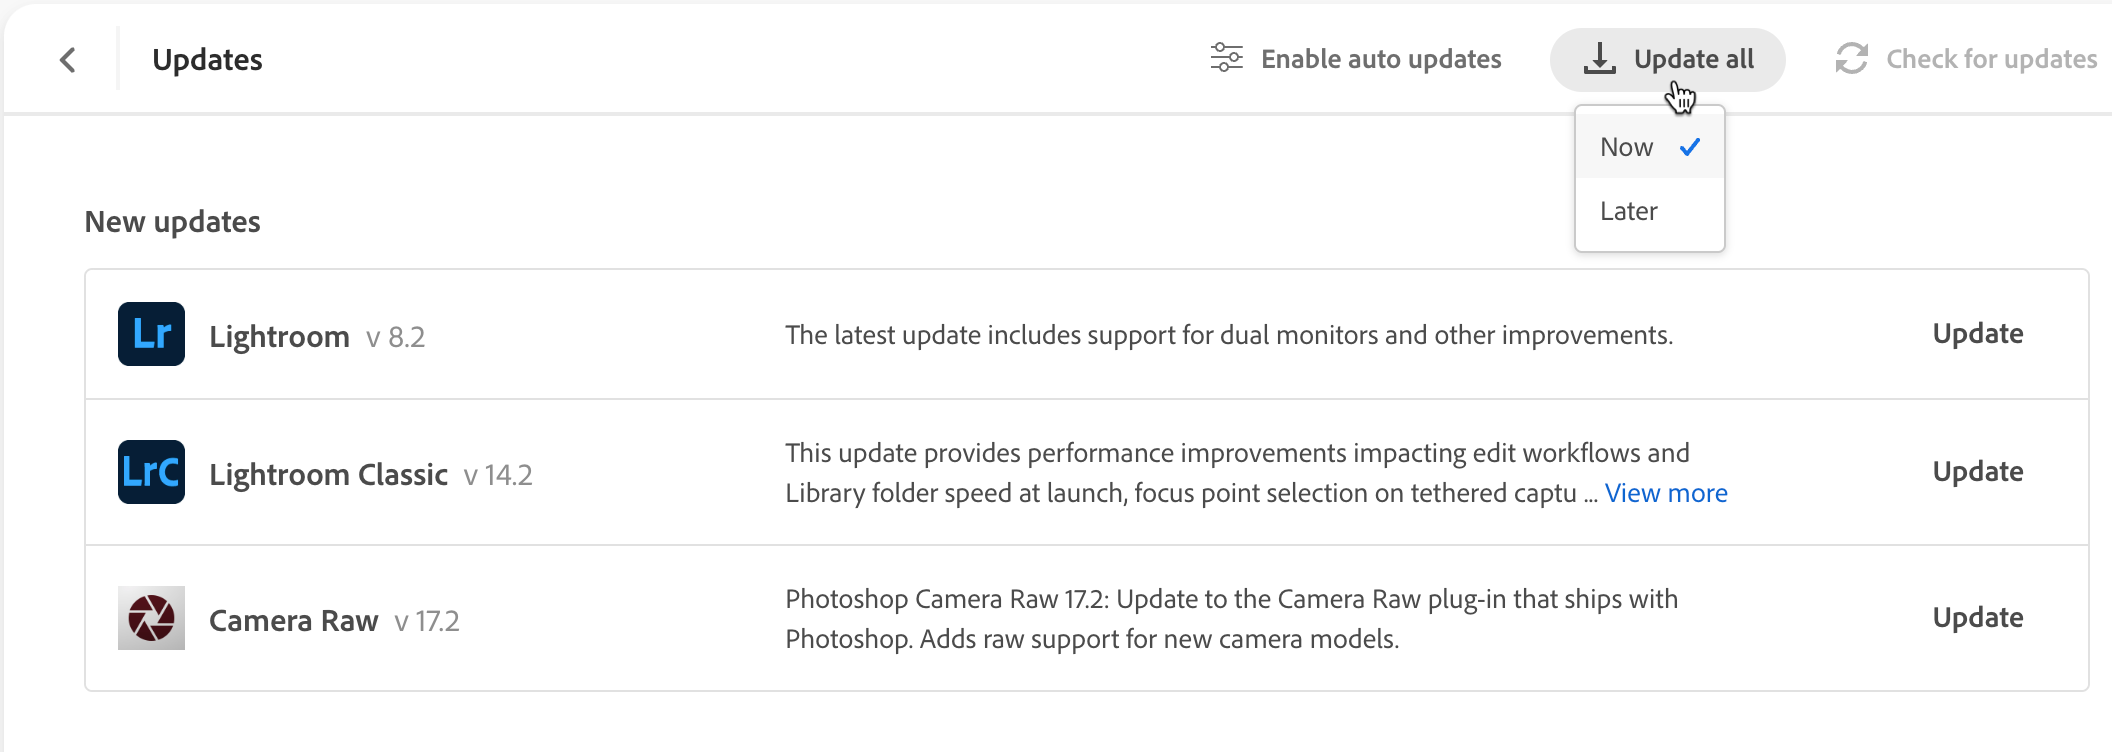
Adobe has released an update for Lightroom Classic (14.2), Lightroom desktop (8.2), Lightroom for mobile (10.2), and Camera Raw (17.2). This update includes support for new cameras and new lenses as well as bug fixes and performance improvements. We did also get some new features, which we’ll explore below.
Adaptive Profiles
Originally released as a public beta in Camera Raw, a more refined version of Adaptive Profiles have now expanded to all of the Lightroom family of apps. For a very detailed explanation of Adaptive Profiles and how they work I highly recommend this article from the Camera Raw team. You can find two new profiles, Adaptive Color and Adaptive B&W under the Profile drop-down menu or in the Profile Browser.
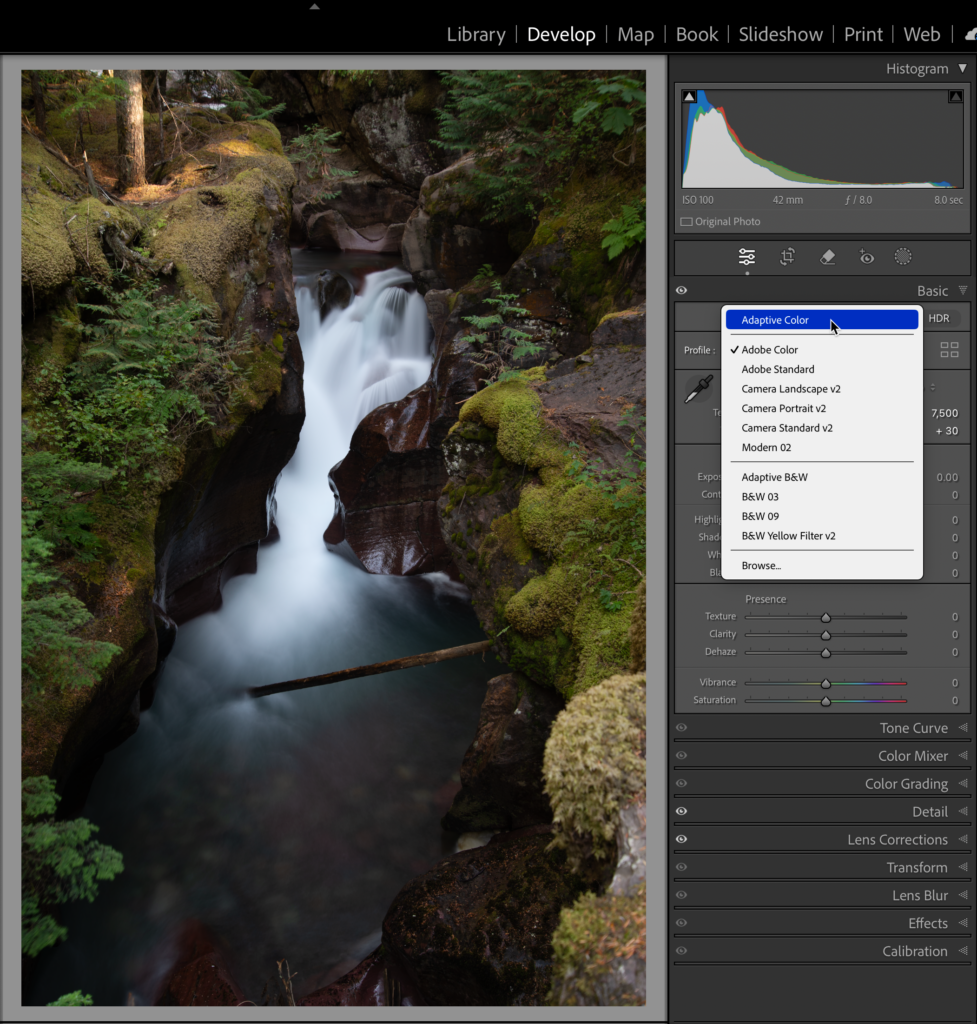
All profiles are a starting point for your editing in which they affect color and tone, but don’t move any of the sliders. The difference with the Adaptive Profiles is that they are powered by machine learning and image dependent. Meaning that when you select an Adaptive Profile the AI powered model analyzes the photo (only raw photos at this time) and adjusts color and tone based on that analysis (be sure to read the article I linked previously for the nitty gritty details) to give you a different starting place than any of the pre-existing profiles. Here’s a comparison of this photo with Adobe Color profile as the Before (left) and Adpative Color as the After (right):
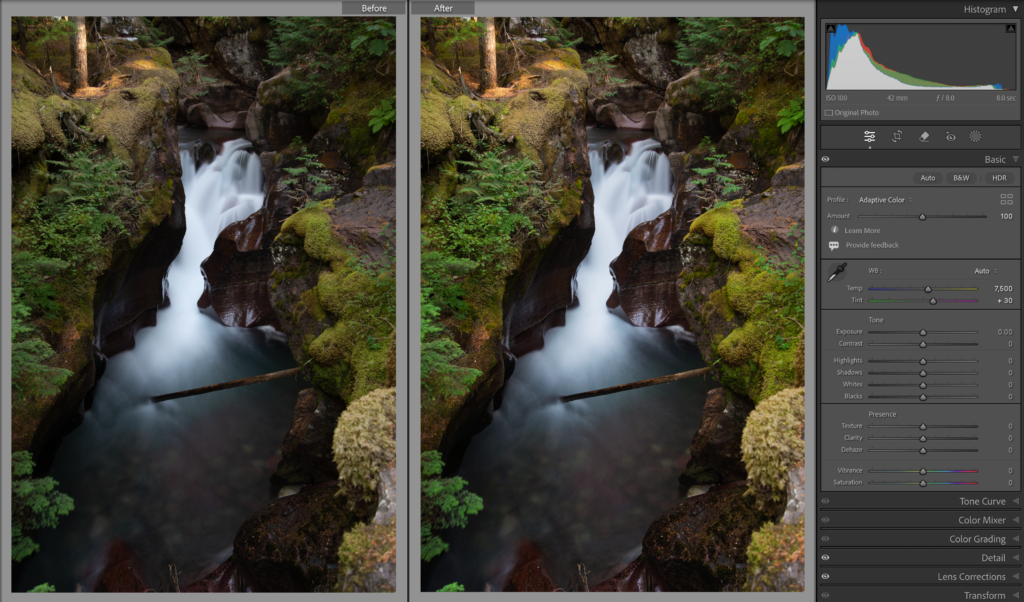
I think the results of the Adaptive Profile is a much more vibrant, yet natural starting point for editing this photo, and notice that all of the adjusments are still zeroed out. However, the Adaptive Profiles also come with an Amount slider, which when decreased dials down the effect of the profile and when increased amplifyies the effect.

These profiles will take some testing to find which photos you feel they work best on, and note that they are not (currently) designed to work in conjunction with the Auto button (it will warn you against this). Originally designed to help with HDR image editing I find they work well on standard dynamic range (SDR) photos that do have a wide range of tones (like the one above). So, give them a try and see what you think.
Backup Catalog Management (LrC)
We talk a lot about the importance of taking advantage of the automated backing up your LrC catalog here at Lightroom Killer Tips, but until now the managment of the removal of old backup catalog files has had to happen completely outside of LrC (in your file browser). With this update, you’ll find a new tab on the Catalog Settings dialog dedicated to catalog backup.
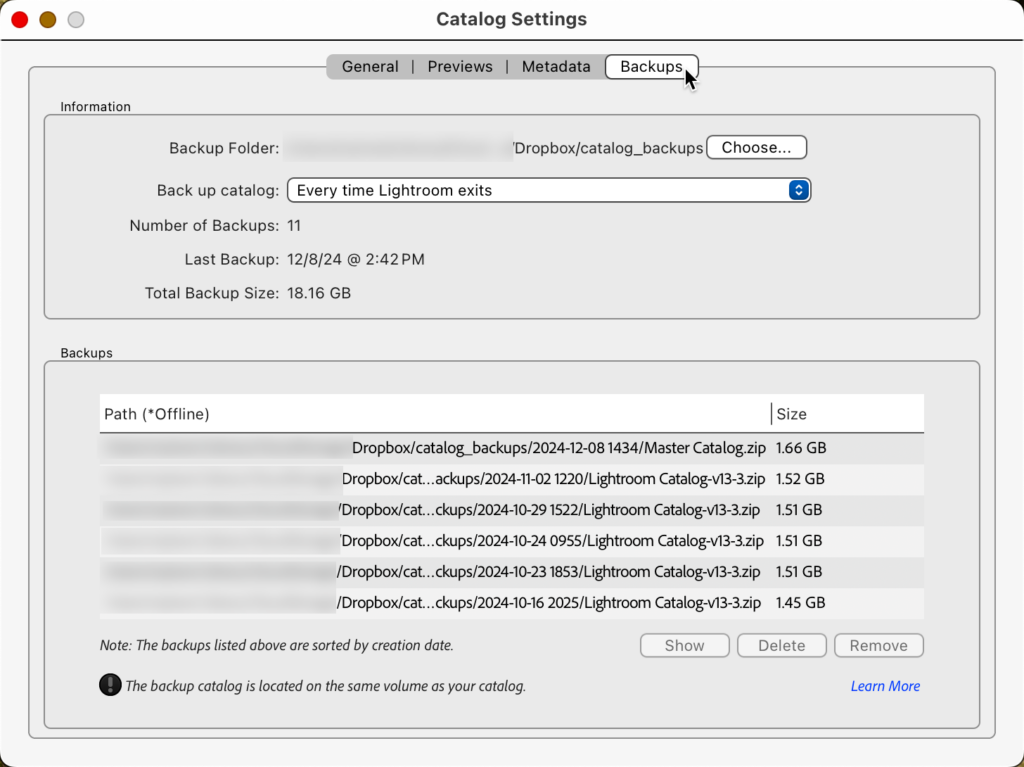
This new Backups tab is also now home to the control for scheduling the backup frequency (previously found on the General tab). My favorite aspect of this new tab is that Adobe finally included the means for choosing the folder where your backup catalog is saved! It will still appear on the dialog that comes up when it prompts you to run the backup, but it makes so much more sense to be able to control that from here before you are prompted to actually run the backup. Thank you, Adobe for doing this!
The other new feature may be a revelation to some folks, which is that it now shows you where your backup copies are stored, how big each file is, and gives you the tools to show the folder containing them in your file browser (click the Show button), delete them from the hard drive (click the Delete button), or remove them from this list without deleting from the hard drive (click the Remove button). Prior to this update, I would just periodically (when I remembered) use my file browser to navigate to the folder containing the backup copies and delete all but the most recent 3 or 4 backup copies. I may still do this out of habit, but now you can more easily see how these are filling up your drive and take control right from within LrC. Hold down the CMD key on Mac / Ctrl key on Windows to select multiple catalog files at once. Happy Spring cleaning!
Focus Point Selection while Tethered
Another new LrC-only feature is the ability to click anywhere in the Live view window (while tethered with a supported camera) to change the focus point. This hasn’t been officially tested on all the cameras that are supported for tethering in general, so your mileage may vary depending on your camera, but I’m sure in time it will expand to support more models.
Additionally, LrC gained some performance enhancments while editing that should improve the experience when using the brush tool in masking, moving white balance sliders, and changing the angle when rotating in the Crop tool.
Secondary Window in Lightroom Desktop
Similar to the Secondary Window in LrC, we now have the abilty to open Secondary Window in Lr as well. This primarily useful for people with two displays, but it can also be used with a single display if you want to have a larger photo grid displayed along with the main window. If you only have a single display (as I do currently), then you need to go to the View menu to control the visibility of the Secondary Window.

If you have a dual display setup, then you will see a button in the Toolbar for launching the Secondary Window.
Fix Angle (Lr for mobile)
If you have Quick Actions enabled in Early Access for Lr on iOS/Android, then you can play around with the new Fix Angle adjustment that quickly fixes crooked angles in photos.

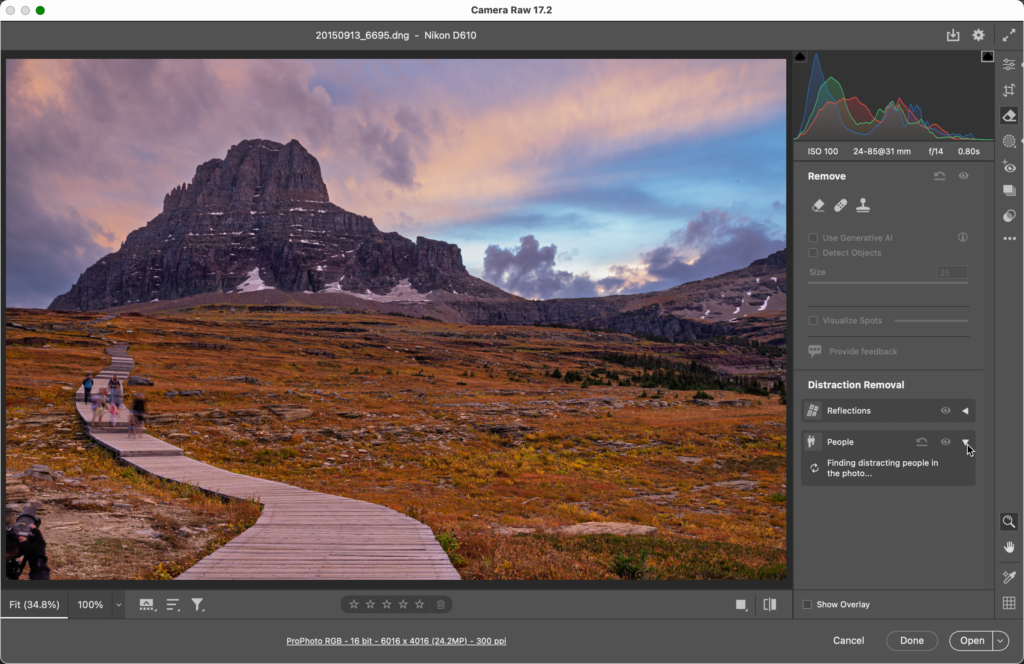
Remove Distracting People (Camera Raw)
Speaking of Early Access/Technology Previews (different terms with same meaning), you’ll want to update the Camera Raw plugin for Photoshop to ensure all the new features in LrC are rendered correctly when sending a copy with edits to Photoshop, but there have been some new beta features added to the Camera Raw plugin that are not (yet) in LrC or Lr. The AI-powered Distraction Removal for People is one such feature. Go to Camera Raw Preferences > Technology Previews and check the box to enable New AI Features and Settings panel to give this feature a try.
Once enabled, with a raw photo (containing distracting people) open in ACR, open the Remove tool, and expand the People section under Distraction Removal. The tool begins scanning the photo for people it thinks are distracting in the scene.
It will display a pin with a red overlay over each distraction it finds. You can select and delete any pin for things you don’t want to be removed.
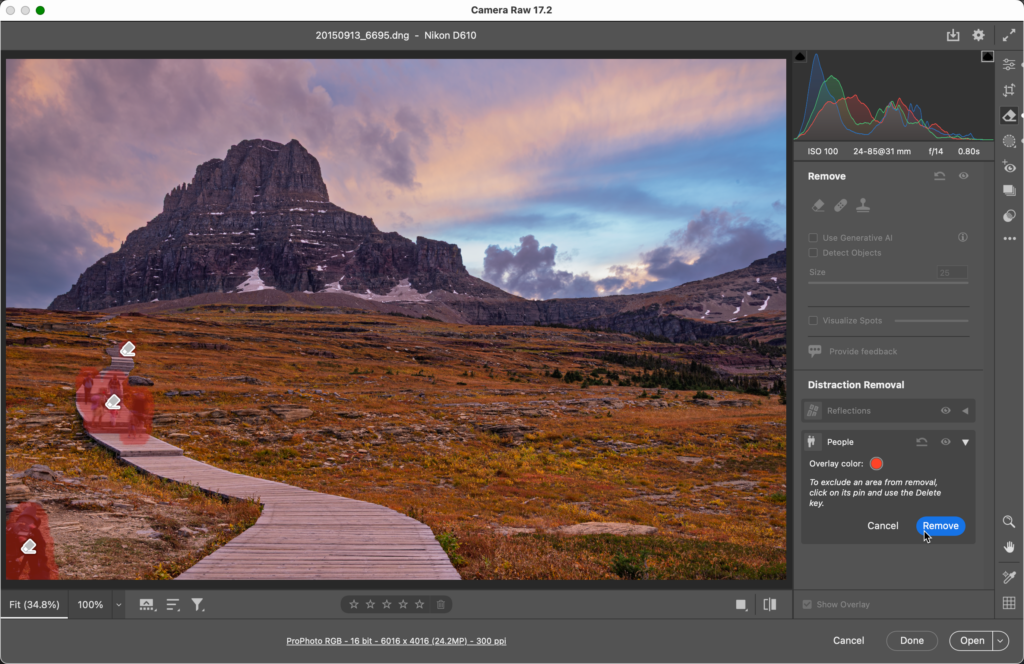
Once you’re happy with what is selected, click the Remove button to have those distractions removed and replaced with new pixels.
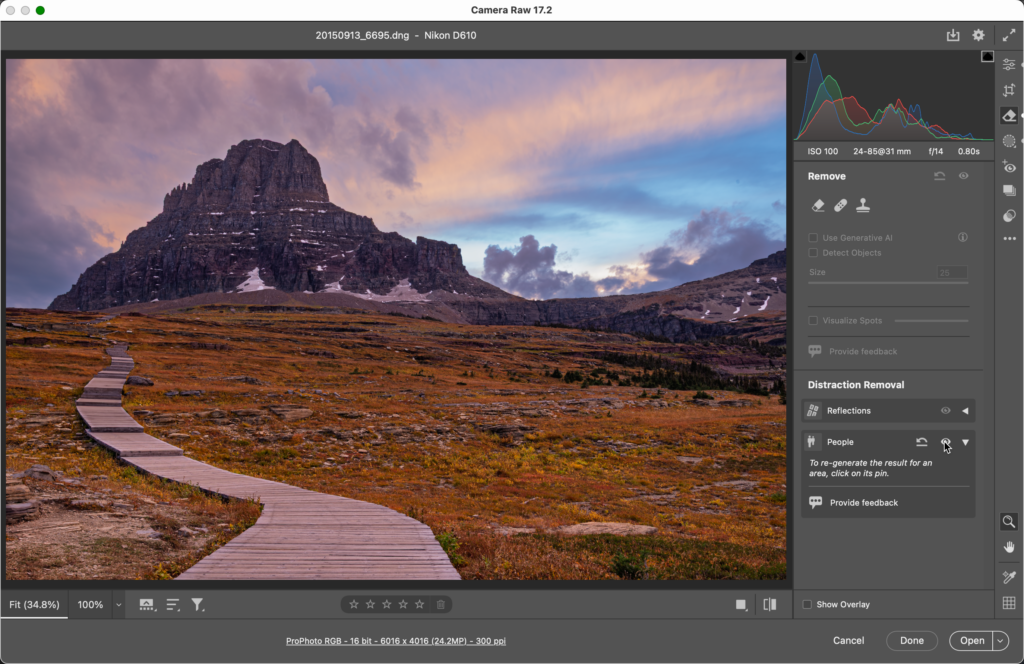
I’m sure we’ll see this feature appear in the Lightroom family of apps in the future. Until then, I’ll do a post on the different ways a LrC user can leverage this tool. Enjoy the update!
The post February Update Lightroom Classic, Lightroom, and Camera Raw appeared first on Lightroom Killer Tips.