


Orcs Must Die! Deathtrap: All traps, ranked
With so many traps available to you, and many more to unlock, it can be overwhelming to figure out what you like. It can be even more complicated trying to figure out what's good. Fortunately, we've put tons of time into the game to help figure out what traps are the best. There's a lot of features to consider, including cost and synergy. We'll call out special cases like that whenever there's a need. In general, these rankings are based on overall performance, considering upgrades and all characters. This is by no means super scientific, but it should help you find some solid strategies quickly. S Rank Traps These are the best of the best, and should probably be in every game. They're just too good to pass up! Screenshot by Destructoid Auto Crossbow - One of the biggest problems in any Orcs Must Die! is accounting for the flying enemies. The Auto Crossbow takes care of that for you- as long as you can find a place to put it. Some stages make it difficult to target flyers that emerge from every door, so keep that in mind. These are best served with Threads that target flyers only, and do additional damage. Otherwise, they're perfectly useful, like the default turret in any Tower Defense type of game. They target everything and can dish out heavy damage. Magic Orb - It might take a couple of ideas to really maximize the use of a Magic Orb. As long as you give it nice hallways or switchbacks to work with, it'll do great. It has a piercing effect that lets it keep bouncing between enemies in narrow corridors, obliterating them. Threads that increase the bounces are the best to power this up. Briar Patch - These take a bit of study to get used to. The nature of the Briar Patch is to get enemies to take damage from it, eventually hitting a threshold that causes the patch to multiply. It's best used at spawn doors and in carefully crafted choke points that all, or most, enemies will run through. Anything that slows enemies and forces them to be on the Briar Patch longer is a big help. If you're playing as Kalos, his taunting totem is perfect for this. Once you learn the tricks of manipulating enemies to spread the patch, you'll see how much damage it can do. Rift Barricade - Added shortly after the game's launch, the Rift Barricade could have been a way for players to have additional Barricades. Most people would have been fine with that. But instead, they also empower adjacent traps, be they floor or wall. They're costly, starting at 4,000 coins each to place. They'll quickly earn their place as surefire equipment when you pepper them along your paths to empower specific traps. We especially love using them with an initial Briar Patch to help it do more damage and spread quicker. A Rank Traps These traps are very solid but tend to rely more on being part of a larger synergy. They're still great, and the more players you have in your team, the more of them you should take. Acid Geyser - Most damage types have two traps associated with them, which is useful to consider when creating setups that give you high combo points. The two Acid traps are both in the A Rank, but consider taking only one of them in your build. In essence, they do the same thing, which is coat your enemies in weakening acid. As the names imply, the Geyser erupts from the ground and the Shower is from the ceiling. Either one is a great pick. It's more situational about what other tools you're using. Acid Shower - The Acid Geyser is probably better for most setups, considering how useful the Shock Zapper and Molten Gold are. Those are both also ceiling traps, and you don't want too many of the same trap types. Remember what else you're using and what stage layouts give you extra room for ceiling traps. Ice Vent - This one started off much lower, but the more we played with it, the more value we saw. Ice is one of the elemental types that stacks your combo points. Having one Ice trap is recommended if you're trying to maximize combo potential, and the other ice trap is not good. The Ice Vent is best used at the end of a "car wash" lane. Douse enemies in acid, gold, fire, poison, and electricity before freezing them and taking them down. Cursed Ground - Cursed Ground has a lot of similarities in use to the Briar Patch. It's a floor trap that damages enemies and gets stronger the more you damage enemies with it. In the case of the Cursed Ground, it's a wider area, but it doesn't expand. Although, there is a Thread that allows it to expand as if it were Bramble. It would honestly be an S Rank with Bramble, but getting that thread is a roll of the dice. Not being able to count on that holds it back a bit. However, it's still a very strong floor trap for busy paths. Bomb Dispenser - One of the things that really makes this trap stand out is how useful it is from higher up. Most wall traps only attack horizontally, meaning they're useless if you put them higher than the floor. Bomb Dispensers, however, make a great ad

With so many traps available to you, and many more to unlock, it can be overwhelming to figure out what you like. It can be even more complicated trying to figure out what's good. Fortunately, we've put tons of time into the game to help figure out what traps are the best.
There's a lot of features to consider, including cost and synergy. We'll call out special cases like that whenever there's a need. In general, these rankings are based on overall performance, considering upgrades and all characters. This is by no means super scientific, but it should help you find some solid strategies quickly.
S Rank Traps
These are the best of the best, and should probably be in every game. They're just too good to pass up!
- Auto Crossbow - One of the biggest problems in any Orcs Must Die! is accounting for the flying enemies. The Auto Crossbow takes care of that for you- as long as you can find a place to put it. Some stages make it difficult to target flyers that emerge from every door, so keep that in mind. These are best served with Threads that target flyers only, and do additional damage. Otherwise, they're perfectly useful, like the default turret in any Tower Defense type of game. They target everything and can dish out heavy damage.
- Magic Orb - It might take a couple of ideas to really maximize the use of a Magic Orb. As long as you give it nice hallways or switchbacks to work with, it'll do great. It has a piercing effect that lets it keep bouncing between enemies in narrow corridors, obliterating them. Threads that increase the bounces are the best to power this up.
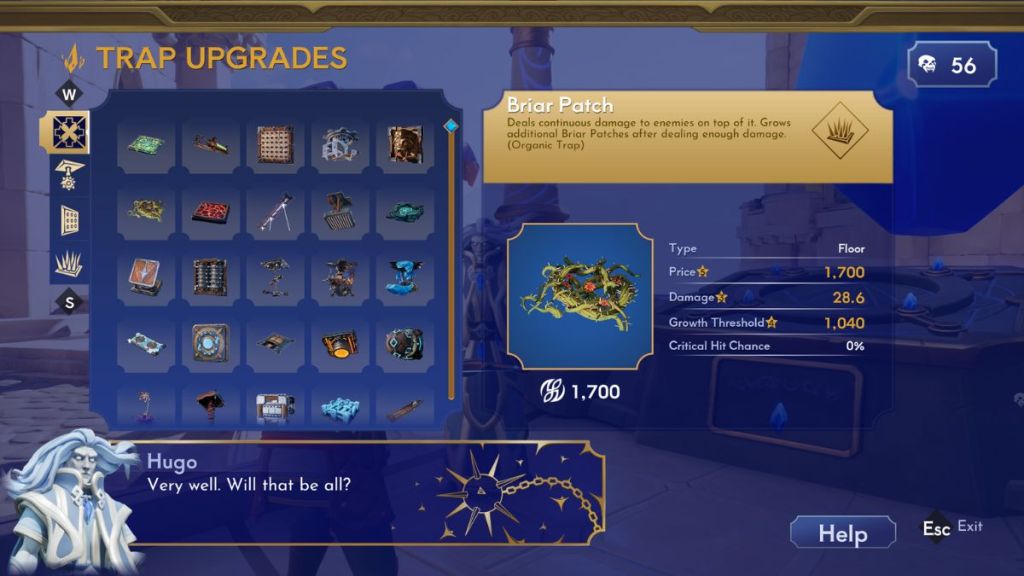
- Briar Patch - These take a bit of study to get used to. The nature of the Briar Patch is to get enemies to take damage from it, eventually hitting a threshold that causes the patch to multiply. It's best used at spawn doors and in carefully crafted choke points that all, or most, enemies will run through. Anything that slows enemies and forces them to be on the Briar Patch longer is a big help. If you're playing as Kalos, his taunting totem is perfect for this. Once you learn the tricks of manipulating enemies to spread the patch, you'll see how much damage it can do.
- Rift Barricade - Added shortly after the game's launch, the Rift Barricade could have been a way for players to have additional Barricades. Most people would have been fine with that. But instead, they also empower adjacent traps, be they floor or wall. They're costly, starting at 4,000 coins each to place. They'll quickly earn their place as surefire equipment when you pepper them along your paths to empower specific traps. We especially love using them with an initial Briar Patch to help it do more damage and spread quicker.
A Rank Traps
These traps are very solid but tend to rely more on being part of a larger synergy. They're still great, and the more players you have in your team, the more of them you should take.
- Acid Geyser - Most damage types have two traps associated with them, which is useful to consider when creating setups that give you high combo points. The two Acid traps are both in the A Rank, but consider taking only one of them in your build. In essence, they do the same thing, which is coat your enemies in weakening acid. As the names imply, the Geyser erupts from the ground and the Shower is from the ceiling. Either one is a great pick. It's more situational about what other tools you're using.
- Acid Shower - The Acid Geyser is probably better for most setups, considering how useful the Shock Zapper and Molten Gold are. Those are both also ceiling traps, and you don't want too many of the same trap types. Remember what else you're using and what stage layouts give you extra room for ceiling traps.
- Ice Vent - This one started off much lower, but the more we played with it, the more value we saw. Ice is one of the elemental types that stacks your combo points. Having one Ice trap is recommended if you're trying to maximize combo potential, and the other ice trap is not good. The Ice Vent is best used at the end of a "car wash" lane. Douse enemies in acid, gold, fire, poison, and electricity before freezing them and taking them down.
- Cursed Ground - Cursed Ground has a lot of similarities in use to the Briar Patch. It's a floor trap that damages enemies and gets stronger the more you damage enemies with it. In the case of the Cursed Ground, it's a wider area, but it doesn't expand. Although, there is a Thread that allows it to expand as if it were Bramble. It would honestly be an S Rank with Bramble, but getting that thread is a roll of the dice. Not being able to count on that holds it back a bit. However, it's still a very strong floor trap for busy paths.
- Bomb Dispenser - One of the things that really makes this trap stand out is how useful it is from higher up. Most wall traps only attack horizontally, meaning they're useless if you put them higher than the floor. Bomb Dispensers, however, make a great addition over a wall of scorchers or Magic Orbs. The decorative lion heads will spit bombs down onto the floor and bring havoc to your enemies. It's an exceptional second wall trap in any build.
- Shock Zapper - This is a powerful ceiling trap. It has a huge range, which is useful for higher ceilings that still let you apply traps. It's also great for targeting flyers. Plus, electricity is one of the few damage types that works well on heavily armored enemies, so it's useful for that as well.
- Molten Gold - This trap might be more personal preference, but the value it puts out can be extremely strong. You won't want a lot of them in your setup, but a few at the start of a trap-laden hallway is a great start. They apply Shiny, which is a unique damage type that adds to your combo. It also makes enemies that die under the effect capable of dropping extra rune coins during your run. The extra cash can help you make even bigger and better trap setups, only requiring a hefty upfront fee to install.
- Tar Trap - Tar Trap is a classic Orcs Must Die! tool, slowing all enemies who walk over it. It also has a lot of versatile threads that can cause further slowing, or cause enemies to take extra damage from fire. It's great for placing in front of Briar Patches, except that it prevents those patches from extending forward. That's still useful for most places, but sometimes you want that stuff to really spread.
- Poison Gas Emitter - There are two poison traps, and it was hard to really give one a higher score than the other. However, the Poison Gas Emtiter has a huge area of influence when it attacks. This can catch a lot of enemies at a time, with great combo potential and a lot of damage. If you don't think you can fit it into your ceilings with other traps you're using, that's totally understandable. The Poison Flower is a good alternative.
- Wall Scorcher - There's nothing much to say other than this does exceptional fire damage. You'll burn your enemies down and stock up on combos. Just don't put this around Briar Patches. It doesn't hurt them, but it causes enemies to speed up when they're on fire. That gets them off the briar faster, which makes them slightly less useful.
B Rank Traps
These traps are usually great when you have a gap somewhere, like if you need another wall or ceiling trap. They're also great for covering damage types. They're not bad by any means, but they don't quite pack the same punch as A rank traps. You might still find a favorite in here, though!
- Wall Charger - If your ceilings are too busy for the Shock Zapper, the Wall Charger is not a bad backup. The biggest flaw here is the reduction in range. It's still useful, and a bit cheaper, so don't be afraid to check it out.
- Rip Saw - This trap feels more fun than it is useful. Setting up a corridor with floor saws feels great, and their long range is very handy. However, Briar Patch is too useful to ignore. Rip Saw gets in the way at a certain point.
- Arrow Wall - This one hurts, it's a personal favorite from the original game. However, the reality is that it's just not very strong. It's versatile, it's solid, but it's not anything super special.
- Brimstone - Brimstone is great as a combo-focused floor trap. Throw in an acid shower and a Wall Charger, and you've got a great score building. Like the Rip Saw, it gets in the way of the Briar Patch. Because of that, and its more limited ability to do damage, the Wall Scorcher is kind of better in every way.
- Ceiling Laser - While this was easily a top-tier trap in Orcs Must Die! 3, it feels like it took a bit of a nerf for Deathtrap. It doesn't have the damage potential it used to, and armored enemies aren't nearly as prevalent. It's not terrible, but it also takes up a lot of ceiling space that could be dedicated to better traps.
- Morningstar Shooter - This trap has a similar use case to the Bomb Dispenser. Put it above your other wall traps and let it drop destructive morningstars onto your enemies. That said, it doesn't seem to be as powerful. Of course, it's smaller, so it fits into tighter nooks and crannies. If you don't have room for the Bomb Dispenser, switch up to the Morningstar Shooter for sure.
- Saw Blade Launcher - This trap looks fun, and it is! Sawblades bouncing all around is great to watch. They can also be set up in certain places for some really spectacular damage. Unfortunately, they're not as versatile. A lot of wide paths keep them from hitting their potential.
- Spike Trap - This is another classic Orcs Must Die! staple. And it's not bad, especially for the coin price. It doesn't quite manage to reach the potential of other traps, and doesn't do much for your Combo potential.
- Poison Flowers - As we mentioned earlier, this is not a bad replacement for the Poison Gas Emitter. It's great because it can fire at a range, and there's a thread that lets you place it on walls for more versatility. But it doesn't seem to poison as many enemies as the Emitter, so there are not as many use cases for it.
- Wall Blades - It's fun to dice up your enemies. And it's a rare narrow trap that can be placed in a lot of fun places. However, it's lack of Combo potential and range make it a hard recommend over several other wall traps.
C Rank Traps
These aren't terrible traps, but they have a lot more drawbacks. Primarily, these are all physics-based traps that are fun to watch. They all require a lot of space and coin, or don't contribute enough to your Combo total to be worth it.
- Steam Vent - A lot of players have gone to bat for the Steam Vent, but we don't see it. It's fun to use, and it's not bad for slowing enemies, but it doesn't have enough versatility for the cost.
- Push Trap - This one is so situational, and it rarely has a good space for itself. This is better as a stalling tactic than something that will clear out chunks of the oncoming hordes.
- Haymaker - A fun trap, to be sure. Unfortunately, it doesn't do enough. It doesn't effect bigger enemies without threads, it has a fairly long cooldown, and the damage output isn't there.
- Grinder - Another fun trap and a useful combo with the Push Trap. However, on its own, there are very few use cases for the Grinder.
- Hookshot - Another fun tool, but it's not fast or powerful enough. It is entertaining to watch it spear an orc and drag them over water or a ledge and then release them. We once had it hold them over an acid geyser for a time, which honestly felt more cruel than we were hoping for. Poor little orcs!
- Minecart Dispenser and Tracks - This is actually two trap slots. One for the Dispenser, and another slot for the Tracks. You can create some super useful halls with devastating minecart crashes, but it requires too much to utilize. Two slots, a lot of money to get up and running, and then it's not very effective. It is super fun to watch, though, which is the only reason it's not a D rank trap.
- Ceiling Pounder - It's a bit basic for our tastes, but it can be handy now and again. The biggest problem is that many ceilings simply aren't low enough for this to be effective.
- Swinging Mace - While this is easily the best version of the Swinging Mace in the entire series, it still remains difficult to spend space on. One swinging mace could be three different Molten Gold dispensers that will earn you a lot more Rune Coins and Combo Points.
D Rank Traps
These traps aren't great right now. There's little to no reason to use them.
- Ice Lance - This is just too expensive and too slow. The ice effect seems to be very situationally useful. Even then, there's really no reason not to have few Auto Crossbows instead and rely on the Ice Vents to freeze enemies.
- Flip Trap - Catapulting your enemies has never felt so useless in this series, and it's a shame. It really comes down to a lack of situations where you can sling your enemies into other traps or an abyss.
- Spike Wall - It's big, it's expensive, and it's too slow. There's not a lot of damage or stopping power here for the resources.
The post Orcs Must Die! Deathtrap: All traps, ranked appeared first on Destructoid.

