


-Classic-Nintendo-GameCube-games-are-coming-to-Nintendo-Switch-2!-00-00-13.png?width=1920&height=1920&fit=bounds&quality=70&format=jpg&auto=webp#)


The Queen’s Maze quest walkthrough in Disney Dreamlight Valley
Let's paint a picture a moment: you hop into Disney Dreamlight Valley to check out the Alice in Wonderland realm, only to realize it's a massive forest maze. After some time, you complete its storyline and even discover a cooking recipe, only to appear in an even harder maze. That's right. Exploring the Queen's Maze is key to progressing through Alice's realm, and it's up to you to navigate this area and find her. Let's dive right into Disney Dreamlight Valley's Queen's Maze quest. Table of contents Find the Queen's Maze's first gate lever Find the Queen's Maze's second gate lever Find the Queen's Maze's final gate levers Find the Queen's Maze's first gate lever Screenshot by Destructoid The first lever is visible right after entering the Queen's Maze. As you run forward, you'll spot the lever near an iron gate and card guard. Here's a complete step-by-step to reaching this spot: Head forward until you reach the brick and metal fence next to the lever. Turn left and head forward until you find another left turn. Turn left and follow the path until you reach a two-way intersection. Go forward here before turning right. Follow this path straight down past the iron gate, avoiding the guard's field of view until you reach the lever. Flipping this lever opens the first gate, letting you pass into the second region of the Queen's Maze. Find the Queen's Maze's second gate lever Screenshot by Destructoid The second lever is easy to find once you know what to look for. After passing through the first gate, walk through and turn left to find a large hedge blocking the way to the second lever. Walking up to this hedge will cause it to shrink in size, allowing you to walk right on in and flip the second switch. The tricky part of this is getting past the guards. Fortunately, nearby side paths will loop you around the card guards, letting you bypass them and run through the garden to the third area. Don't worry if a guard catches you—you'll respawn nearby, letting you try again until you make it to the end. Find the Queen's Maze's final gate levers Screenshot by Destructoid Screenshot by Destructoid Unlike the previous two areas, this one requires two levers to unlock its gate. The first one is easily accessible by running forward through the hedge and turning right. The lever will be right beside your character to interact with. The next is a little tougher to find. Starting from the first lever's spot, head left to uncover another hedge before looking left. You'll spot the lever behind a guard, whom you'll have to avoid before looping around and activating the switch. With this second lever activated, you'll now have access to the Queen's Maze's exit. You'll find the exit by turning toward the card guard, running past it, and looking for an open exit to your left. After reaching the final area, you'll have a few more card guards to pass before approaching the exit, allowing you to talk to Alice, wrap up the Queen's Maze quest, and immediately begin the Teeny, Tiny Problems mission. The post The Queen’s Maze quest walkthrough in Disney Dreamlight Valley appeared first on Destructoid.


Let's paint a picture a moment: you hop into Disney Dreamlight Valley to check out the Alice in Wonderland realm, only to realize it's a massive forest maze. After some time, you complete its storyline and even discover a cooking recipe, only to appear in an even harder maze.
That's right. Exploring the Queen's Maze is key to progressing through Alice's realm, and it's up to you to navigate this area and find her. Let's dive right into Disney Dreamlight Valley's Queen's Maze quest.
Table of contents
Find the Queen's Maze's first gate lever
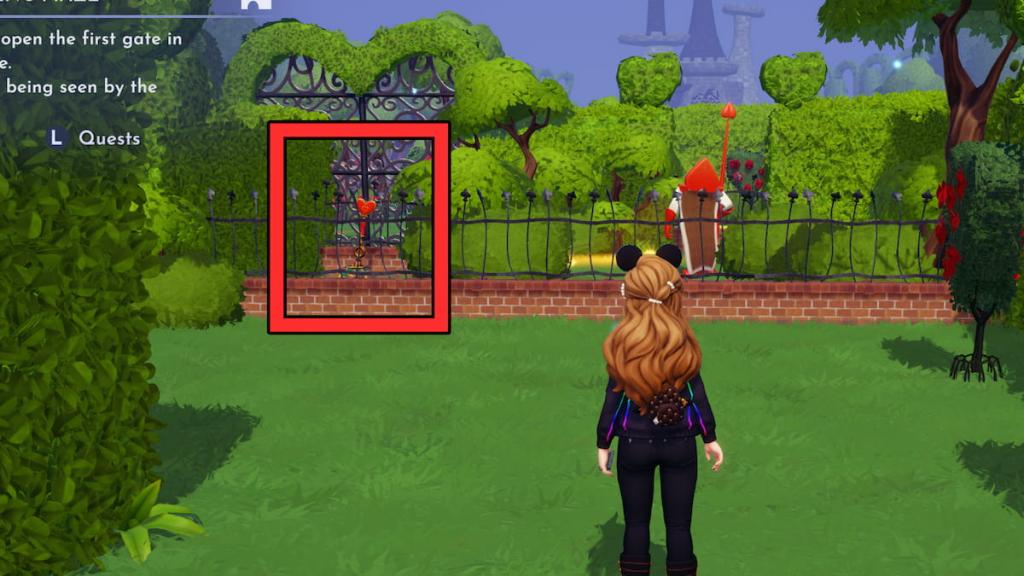
The first lever is visible right after entering the Queen's Maze. As you run forward, you'll spot the lever near an iron gate and card guard. Here's a complete step-by-step to reaching this spot:
- Head forward until you reach the brick and metal fence next to the lever.
- Turn left and head forward until you find another left turn.
- Turn left and follow the path until you reach a two-way intersection. Go forward here before turning right.
- Follow this path straight down past the iron gate, avoiding the guard's field of view until you reach the lever.
Flipping this lever opens the first gate, letting you pass into the second region of the Queen's Maze.
Find the Queen's Maze's second gate lever

The second lever is easy to find once you know what to look for. After passing through the first gate, walk through and turn left to find a large hedge blocking the way to the second lever. Walking up to this hedge will cause it to shrink in size, allowing you to walk right on in and flip the second switch.
The tricky part of this is getting past the guards. Fortunately, nearby side paths will loop you around the card guards, letting you bypass them and run through the garden to the third area. Don't worry if a guard catches you—you'll respawn nearby, letting you try again until you make it to the end.
Find the Queen's Maze's final gate levers


Unlike the previous two areas, this one requires two levers to unlock its gate. The first one is easily accessible by running forward through the hedge and turning right. The lever will be right beside your character to interact with.
The next is a little tougher to find. Starting from the first lever's spot, head left to uncover another hedge before looking left. You'll spot the lever behind a guard, whom you'll have to avoid before looping around and activating the switch. With this second lever activated, you'll now have access to the Queen's Maze's exit. You'll find the exit by turning toward the card guard, running past it, and looking for an open exit to your left.
After reaching the final area, you'll have a few more card guards to pass before approaching the exit, allowing you to talk to Alice, wrap up the Queen's Maze quest, and immediately begin the Teeny, Tiny Problems mission.
The post The Queen’s Maze quest walkthrough in Disney Dreamlight Valley appeared first on Destructoid.

